2010년 4월 29일 목요일

메타태크<META TAGS>

<META HTTP-EQUIV="Expire" CONTENT="-1"> :캐쉬 완료(파기)시간 정의
<META HTTP-EQUIV="Last-Modified" CONTENT="Mon,10 Jul 2000 18:47:14"> :최종수정일
<META HTTP-EQUIV='Cache-Control' CONTENT='no-cache'>
<META HTTP-EQUIV='Pragma' CONTENT='no-cache'> :캐쉬가 되지 않게 하는 태그
<META HTTP-EQUIV="Content-type" content="text/html; charset=euc-kr"> :웹문서의 언어를 설정
<META HTTP-EQUIV="Imagetoolbar" content="no"> :그림위에 마우스 오버시 이미지 관련 툴바가 생기지 않음
<META HTTP-EQUIV="Refresh" content="15;URL=http://galaxy.channeli.net/jakalky/sitemap.htm"> :페이지이동
<META HTTP-EQUIV="Page-Enter" content="RevealTrans(Duration=5/시간 초단위, Transition=21) "> :페이지 로딩시 트랜지션 효과(장면 전환 효과)

<META name="Subject" content="홈페이지주제">
<META name="Title" content="홈페이지이름">
<META name="Description" content="설명문">
<META name="Keywords" content="키워드">
<META name="Author" content="만든사람">
<META name="Publisher" content="만든단체나회사">
<META name="Other Agent" content="웹책임자">
<META name="Classification" content="카테고리위치(분류)">
<META name="Generator" content="생성프로그램(에디터)">
<META name="Reply-To(Email)" content="메일주소">
<META name="Filename" content="파일이름">
<META name="Author-Date(Date)" content="제작일">
<META name="Location" content="위치">
<META name="Distribution" content="배포자">
<META name="Copyright" content="저작권">
<META name="Robots" content="ALL">

<META name="robots" content="index,follow" /> : 이 문서도 긁어가고 링크된 문서도 긁어감.
<META name="robots" content="noindex,follow" /> : 이 문서는 긁어가지 말고 링크된 문서만 긁어감.
<META name="robots" content="index,nofollow" /> : 이 문서는 긁어가되, 링크는 무시함.
<META name="robots" content="noindex,nofollow" /> : 이 문서도 긁지 않고, 링크도 무시함.

2010년 4월 25일 일요일

Java inputStream <-> String

출처: http://childeye.tistory.com/171

inputStream -> String


StringBuffer out = new StringBuffer();
    byte[] b = new byte[4096];
    for (int n; (n = inputStream.read(b)) != -1;) {
        out.append(new String(b, 0, n));
    }
 out.toString();

-------------------------------------------------

String -> inputStream

  InputStream bai = new ByteArrayInputStream(out.toString().getBytes("UTF-8"));

2010년 4월 23일 금요일

자식창과 부모창의 관계, iframe 내부와 메인페이지와의 관계제어

출처 : http://mainia.tistory.com/423


javascript 에서 새로 띄운 자식창과 부모창, iframe 내부와 메인페이지간의 제어 방법에 대한

다양한 예제를 학습해본다.


1. 자식창에서 부모창의 특정 Form 에 데이터를 집어넣고 싶을 때

자식창에서 부모창을 가리킬 때 opener 객체를 사용한다. document.Form.input 은 부모창에

속해있는 요소이다.

opener.document.Form.input.value = “”;


2. 자식창에서 부모창의 페이지를 이동시키고 싶을 때

부모창을 원하는 페이지로 이동시킨후 자식창(자기자신) 은 닫는다.

window.opener.location.href = “/admin/login.jsp” ;

window.close();


3. 자식창에서 부모창을 새로고침하고 싶을 때

if (!opener.closed){

           opener.document.location.reload();

           window.close();

}


4. iframe 내부에서 외부에 있는 메인페이지의 특정 Form 에 값을 집어넣고 싶을 때

iframe 에서 메인을 가리킬때는 parent 객체로 접근한다.

parent.Form.input.value = “”;


5. iframe 내부에서 외부에 있는 메인페이지의 스크립트 함수를 실행하고자 할 때

parent.[메인함수명]

parent.DoSend();


6. 메인에서 iframe 의 페이지를 이동시키고 싶을 때

[iframe 이름].location.href

frame.location.href=”www.naver.com”;

<iframe name=”frame”>

####

</iframe>


7. 위의 2가지 경우를 섞은것이다. 부모창의 iframe 에서 새창을 하나 띄웠다.

자식창에서 부모창의 페이지를 이동하고 싶은것이다.

이것은 부모창의 iframe 에 갔다가 메인으로 다시 이동해야한다.

2가지의 방법이 있는데 첫번째는 window.opener 를 호출하여 iframe으로간뒤

parent 로 메인에 접근한다.

window.opener.parent.location.href = “URL”;


두번째는 top 을 이용해서 부모창을 바로 찾는것이다

top.opener.location.href = “URL”;

301 Redirect

출처: http://blog.artience.co.kr/36

위치로그 태그 미디어로그 방명록

오늘은 301 Redirect 이야기를 해보려 합니다.

일반적으로 사이트를 운영하다 보면 여러 이유들로 인해서 도메인이 변경이 되거나 특정 페이지 URL 의 변경이 생길 수 있습니다.
예를 들어 www.oldurl.com 을 운영중에 도메인이 www.newurl.com 으로 변경 되었다고 가정하여 보겠습니다.
이런 경우 보통 www.oldurl.com 페이지의 HTML 내용에 아래와 같은 내용으로 페이지를 강제 이동시키는 것을 볼수 있습니다.

1. javascript
document.lcoation.href = "http://wwww.newurl.com";

2. Meta Refresh
<meta http-equiv="refresh" content="0; url=http://wwww.newurl.com">

이런 방식은 사용자의 구 사이트 방문을 신규사이트로 이동 시켜주는 역활은 가능합니다.

그런데 만약...
 www.oldurl.com도메인이 검색엔진에 등록이 되어있고 특정 키워드로 검색결과 1위에 노출되고 있었다면...
그렇다면 검색엔진은 위의 1, 2 번 방식의 내용을 통하여
www.oldurl.com 에서 www.newurl.com 으로 도메인이 변경 되었다고 인식할까요?
그렇다고 하면 동일 키워드로 검색 시
www.newurl.com 도메인도 구 도메인 처럼 1위에 노출이 될까요?


정답은 "아니오" 입니다.

이점이 301 Redirect 이야기를 하려는 핵심 입니다.

(여기서 301 이란? HTTP 상태코드의 하나로 요청 페이지가 영구적으로 신규 페이지로 변경되었음을 알려주는 HTTP 상태코드)

즉 검색엔진에게 www.oldurl.com 요청이 오면 301 응답을 통하여 www.newurl.com 으로 도메인이 영구 변경되었음을 알려주는 역활을 합니다.
301 Redirect 사용 시 구 도메인 방문자를 신규 사이트로 전환하여 주며 검색엔진 검색순위 보존, 외부링크 인기도 보존, Google PageRank 까지도 보존이 가능하게 됩니다.

이런 이유로 도메인 변경이나 페이지 URL 의 변경 시 301 Redirect 는 필수 요소 입니다.

그럼 간단히 301 Redirect 설정을 알아보죠.
역시 www.oldurl.com 과  www.newurl.com 을 이용하여 설명 드리겠습니다.

가장 널리 이용되고 있는 apache 웹서버의 경우 .htaccess 를 이용한 방법 설명 입니다.

메모장같은 텍스트 에디터를 이용 아래의 내용으로 작성하여 .htaccess 파일명으로 저장  www.oldurl.com 홈 디렉토리에 업로드 하시면 됩니다.
Redirect 301 / http://www.newurl.com/

참 쉽죠~

또 다른 방법으로는 사용하는 각 언어별 직접 소스 적용 방법이 있습니다.

PHP
<?
Header( "HTTP/1.1 301 Moved Permanently" );
Header( "Location: http://www.newurl.com/" );
?>


ASP
<%@ Language=VBScript %>
<%
Response.Status="301 Moved Permanently"
Response.AddHeader "Location",http://www.newurl.com/
%>


ASP .NET
<script runat="server">
  private void Page_Load(object sender, System.EventArgs e){
   Response.Status = "301 Moved Permanently";
   Response.AddHeader("Location",http://www.newurl.com/);
  }
</script>


JSP
<%
response.setStatus(301);
response.setHeader( "Location", http://www.newurl.com/ );
response.setHeader( "Connection", "close" );
%>

이제 도메인 변경이나 페이지 url 변경 시 꼭 301 Redirect 사용하실거죠~~
이상 아티언스 필진 Nisha 였습니다. 좋은 하루 되세요~ ^.~

301 Redirect의 다른 활용법을 알고 싶으시다면....클릭클릭

2010년 4월 10일 토요일

콘솔창에서 oracle http port 변경

콘솔창에서 oracle http port 변경

1. 시작-실행-cmd
 =>sqlplus
2. 사용자명 입력:system
   암호:XXX
3. exec dbms_xdb.sethttpport(8088);

log4sql 사용


출처: http://realcool.egloos.com/6061439 

http://log4sql.sourceforge.net/index_kr.html

사용법
1.다운받은 zip파일을 압축을 풀고 log4sql.jar를 클래스 패스에 넣습니다.
2.commons-lang.jar파일을 다운받아서 클래스 패스에 넣습니다.
3.드라이버명을 다음과 같이 바꿉니다.

JDBC TYPE Origin Your Driver Class -> log4sql Driver Class
[ORACLE DRIVER CLASS] 'oracle.jdbc.drirver.OracleDriver' -> 'core.log.jdbc.driver.OracleDriver'
[MYSQL DRIVER CLASS] 'com.mysql.jdbc.Driver' or'org.gjt.mm.mysql.Driver' -> 'core.log.jdbc.driver.MysqlDriver'
[SYBASE DRIVER CLASS] 'com.sybase.jdbc2.jdbc.SybDriver' -> 'core.log.jdbc.driver.SybaseDriver'
[DB2 DRIVER CLASS] 'com.ibm.db2.jcc.DB2Driver' -> 'core.log.jdbc.driver.DB2Driver'
[INFOMIX DRIVER CLASS] 'com.informix.jdbc.IfxDriver' -> 'core.log.jdbc.driver.InfomixDriver'
[POSTGRESQL DRIVER CLASS] 'org.postgresql.Driver' -> 'core.log.jdbc.driver.PostgresqlDriver'
[MAXDB DRIVER CLASS] 'com.sap.dbtech.jdbc.DriverSapDB' -> 'core.log.jdbc.driver.MaxDBDriver'
[FRONTBASE DRIVER CLASS] 'com.frontbase.jdbc.FBJDriver' -> 'core.log.jdbc.driver.FrontBaseDriver'
[HSQL DRIVER CLASS] 'org.hsqldb.jdbcDriver' -> 'core.log.jdbc.driver.HSQLDriver'
[POINTBASE DRIVER CLASS] 'com.pointbase.jdbc.jdbcUniversalDriver' -> 'core.log.jdbc.driver.PointBaseDriver'
[MIMER DRIVER CLASS] 'com.mimer.jdbc.Driver' -> 'core.log.jdbc.driver.MimerDriver'
[PERVASIVE DRIVER CLASS] 'com.pervasive.jdbc.v2.Driver' -> 'core.log.jdbc.driver.PervasiveDriver'
[DAFFODILDB DRIVER CLASS] 'in.co.daffodil.db.jdbc.DaffodilDBDriver' -> 'core.log.jdbc.driver.DaffodiLDBDriver'
[JDATASTORE DRIVER CLASS] 'com.borland.datastore.jdbc.DataStoreDriver' -> 'core.log.jdbc.driver.JdataStoreDriver'
[CACHE DRIVER CLASS] 'com.intersys.jdbc.CacheDriver' -> 'core.log.jdbc.driver.CacheDriver'
[DERBY DRIVER CLASS] 'org.apache.derby.jdbc.ClientDriver' -> 'core.log.jdbc.driver.DerbyDriver'
[ALTIBASE DRIVER CLASS] 'Altibase.jdbc.driver.AltibaseDriver' -> 'core.log.jdbc.driver.AltibaseDriver'
[MCKOI DRIVER CLASS] 'com.mckoi.JDBCDriver' -> 'core.log.jdbc.driver.MckoiDriver'
[JSQL DRIVER CLASS] 'com.jnetdirect.jsql.JSQLDriver' -> 'core.log.jdbc.driver.JsqlDriver'
[JTURBO DRIVER CLASS] 'com.newatlanta.jturbo.driver.Driver' -> 'core.log.jdbc.driver.JturboDriver'
[JTDS DRIVER CLASS] 'net.sourceforge.jtds.jdbc.Driver' -> 'core.log.jdbc.driver.JTdsDriver'
[INTERCLIENT DRIVER CLASS] 'interbase.interclient.Driver' -> 'core.log.jdbc.driver.InterClientDriver'
[PURE JAVA DRIVER CLASS] 'org.firebirdsql.jdbc.FBDriver' -> 'core.log.jdbc.driver.PureJavaDriver'
[JDBC-ODBC DRIVER CLASS] 'sun.jdbc.odbc.JdbcOdbcDriver' -> 'core.log.jdbc.driver.JdbcOdbcDriver'
[MSSQL 2000 DRIVER CLASS] 'com.microsoft.jdbc.sqlserver.SQLServerDriver' -> 'core.log.jdbc.driver.MssqlDriver'
[MSSQL 2005 DRIVER CLASS] 'com.microsoft.sqlserver.jdbc.SQLServerDriver' -> 'core.log.jdbc.driver.Mssql2005Driver'

콘솔에서 확인해보면 쿼리가 출력되고 실행시간도 출력이 됩니다.

오라클 분석함수(ratio_to_report)를 사용하여 비율 구하기 (퍼센트)

http://blog.naver.com/tyboss?Redirect=Log&logNo=70043043176


[출처] 오라클 분석함수(ratio_to_report)를 사용하여 비율 구하기 (퍼센트)|작성자 마루아라

RATIO_TO_REPORT


문법

ratio_to_report::=

그림 설명


참 조 :

"Analytic Functions " for information on syntax, semantics, and restrictions, including valid forms of expr


목적

RATIO_TO_REPORT함수는 분석 함수이다. 이 함수는 값의 세트의 합에 대한 값의 비율을 계산한다. 만약 expr이 NULL이라면, ratio-to-report값은 NULL이다.

값의 집합은 query_partition_clause에 의해서 정해진다. 만약 이 구문을 생략한다면, ratio-to-report는 쿼리에 의해 반환되는 모든 열에 의해 계산된다.

expr에 대해서는 RATIO_TO_REPORT 또는 임의의 다른 분석 함수를 이용할수 없다. 중첩 분석 함수는 이용할수 없으나, 다른 내장 함수를 이용할수 있다.

참고

http://www.elancer.co.kr/eTimes/page/eTimes_view.html?str=c2VsdW5vPTYxMg==


예제

다음 예제는 모든 사무원의 급여의 합계에 대한 각 사무원의 급여의 비율 값을 계산한다.

SELECT last_name, salary, RATIO_TO_REPORT(salary) OVER () AS rr
FROM employees
WHERE job_id = 'PU_CLERK';

LAST_NAME SALARY RR
------------------------- ---------- ----------
Khoo 3100 .223021583
Baida 2900 .208633094
Tobias 2800 .201438849
Himuro 2600 .18705036
Colmenares 2500 .179856115


테이블 table_123에서 점이 1100인 것의

select mngbr, cifno, jikwonno, janamt
, row_number() over(partition by jikwonno order by mngbr, cifno ) accum -- 직원별 순차번호
, sum(janamt) over(partition by jikwonno order by mngbr, cifno rows between unbounded preceding and current row) accum1
-- 점,직원별/ 고객번호순 잔액의 누적
, sum(janamt) over(partition by jikwonno) accum_tot -- 점,직원별 잔액의 합계
, round(ratio_to_report(janamt) over(partition by jikwonno) * 100, 2) ratio_tot -- 점,직원별 잔액이 차지하는 비율
from table_123
where mngbr = 1100


  References

  1. Oracle Database SQL Reference 10g Release 2 (10.2) Part Number B14200-02
  - http://download-west.oracle.com/docs/cd/B19306_01/server.102/b14200/functions124.htm


  2. 출처

  - http://www.soqool.com/servlet/board?cmd=view&cat=100&subcat=1030&seq=352&page=2&position=2


==========================================================================================================================

==========================================================================================================================


http://www.oracleclub.com/article/44234


테이블에  금액/갯수 해서 저장하는 금액 컬럼 과 금액/갯수해서 나온 각각의 비율을 저장하는 컬럼이 있씁니다
금액 컬럼은 정수만 들어가고요..
비율을 소수점 2째자리까지 들어 갑니다
금액은 금액/갯수 해서 소숫점이 나오면 .. 소수점을 제거 하고
정수만 모두 더한후 원래의 금액이 될대까지 1원씩 루프를 돌면서 더합니다
밑에 처럼요...
select 90922255/3 from dual  -- 30307418.3333333
select 30307418 + 30307418 + 30307418 from dual  -- 90922254
select 30307419 + 30307418 + 30307418 from dual  -- 90922255  -- 100 으로 맟추기 위해서 1번째 것에 1을 더함

그럼 금액은 맞아지는대요...

위에서 구한 금액에 맞게 각각의 비율을 구해야 하는대... 비율을 소수점 2째자리까지 계산할수 있씁니다.
이런건 밑에 2가지 경우중 어떤게 맞는 건가요?


1번째 :

select  ((90922255/3)/90922255)*100 from dual  -- 33.3333333333333

select 33.33 + 33.33 + 33.33 from dual  -- 99.99

select 33.34 + 33.33 + 33.33 from dual  -- 100 으로 맟추기 위해서 1번째 것에 1을 더함

2번째 :

select  ((90922255/3)/90922255)*100 from dual  -- 33.3333333333333

select 33 + 33 + 33 from dual  -- 99

select 34 + 33 + 33 from dual   -- 100 으로 맟추기 위해서 1번째 것에 1을 더함


-------------------------------------------------------------------------------------------------------------------------


SELECT a, b
, LEVEL lv
, TRUNC(a/b) + CASE WHEN LEVEL <= a-TRUNC(a/b)*b THEN 1 ELSE 0 END v1
, TRUNC(100/b) + CASE WHEN LEVEL <= 100-TRUNC(100/b)*b THEN 1 ELSE 0 END v2
, TRUNC(100/b,2) + CASE WHEN LEVEL*0.01 <= 100-TRUNC(100/b,2)*b THEN 0.01 ELSE 0 END v3
FROM (SELECT 90922255 a, 3 b FROM dual)
CONNECT BY LEVEL <= b

오라클 누적 데이터 select

<원본 데이터 >

MSG_ID BASE_AMT
====================

205117 1400
423266 1000
423267 1000
423268 1000
891138 1400
891139 1000

<누적 합계>

MSG_ID BASE_AMT 누적합계

===========================

205117 1400 1400
423266 1000 2400
423267 1000 3400
423268 1000 4400
891138 1400 5800
891139 1000 6800

위와 같은 결과를 얻고 싶을 때, 다음과 같은 방법으로 select한다.


   select  msg_id,  base_amt,
   sum(base_amt) over(order by msg_id rows between unbounded preceding and current row) 
   from cdr_data
   where   subscr_no = 228377;

2010년 4월 6일 화요일

Ibatis 트랜잭션


try {
sqlMap.startTransaction ();
.....

sqlMap.commitTransaction ();
} finally {
sqlMap.endTransaction ();
}

==========================================================
public class IBatis {
   
    private static SqlMapClient sqlMapClient;
   
    /**
     * <pre>
     * SqlMapClient 객체를 구해오는 메소드입니다.
     * </pre>
     *
     * @return
     */
    public static synchronized SqlMapClient getSqlMapClient(){
        if(sqlMapClient==null){
            String resource = "kr/co/dungeonMaster/db/SqlMapConfig.xml";
            Reader reader;
            try {
                reader = Resources.getResourceAsReader(resource);
                sqlMapClient = SqlMapClientBuilder.buildSqlMapClient(reader);
                reader.close();
            } catch (IOException e) {
                throw new RuntimeException("Something bad happened while building the SqlMapClient instance."+ e, e);
            }
        }
        return sqlMapClient;
    }
   
}

2010년 4월 5일 월요일

quartz

퍼온글:

http://www.easywayserver.com/blog/java-job-scheduling-in-web-application-with-quartz-api/


Java – Job Scheduling in web application with quartz API

Scheduling job in web application is important part of application. Today most of the companies and programmer keep eye on the performance of the application. They do it by running most of work in background of the application without the knowledge of the user. Manual work is going to automize in these days and run in idle time of working hours.

If you want to send email at fixed time, send newsletter, taking backup of database, synchronizing of databases, setting up reminder, all need to run schedule job at particular interval.

Java is bundled with timer class to perform scheduling task and make your own logics to perform scheduling by while loop with sleep thread. But this is not good way to schedule more than one job at a time.

Timer class is good option for scheduling task, but it still doesn’t have optional day selection like in cron of linux.

Quartz is scheduling API which fulfill your all need and easy to use and initialization of scheduling.

We can use simple trigger with millisecond and repeat jobs and set repeat intervals. Advance Trigger CronTrigger works exactly same unix cron. In CronTrigger we can define, selected days e.g. Wednesday, Friday weekly, monthly and yearly.

In quartz, we can monitor our jobs and in between can stop jobs.

Quartz scheduling can be used with servlet initialization and struts initialization.

In servlet initialization, we have to define in web.xml and in struts we have to define plugin in struts-config.xml.

1. Quartz with Simple Servlet

web.xml

<web-app>
<display-name>timer</display-name>

<servlet>
<servlet-name>InitializeServlet</servlet-name>
<servlet-class>com.cron.InitializeServlet</servlet-class>
<load-on-startup>1</load-on-startup>
</servlet>

</web-app>

InitializeServlet.java

package com.cron;

import javax.servlet.ServletException;
import javax.servlet.http.HttpServlet;

public class InitializeServlet extends HttpServlet {

public void init() throws ServletException {

try {
System.out.println("Initializing NewsLetter PlugIn");

CronScheluder objPlugin = new CronScheluder();

}
catch (Exception ex) {
ex.printStackTrace();
}

}

}

CronScheluder.java

package com.cron;

import org.quartz.CronTrigger;
import org.quartz.JobDetail;
import org.quartz.Scheduler;
import org.quartz.SchedulerFactory;
import org.quartz.impl.StdSchedulerFactory;

public class CronScheluder {

public CronScheluder() throws Exception {

SchedulerFactory sf = new StdSchedulerFactory();

Scheduler sche = sf.getScheduler();

sche.start();

JobDetail jDetail = new JobDetail("Newsletter", "NJob", MyJob.class);

//"0 0 12 * * ?" Fire at 12pm (noon) every day
//"0/2 * * * * ?" Fire at every 2 seconds every day

CronTrigger crTrigger = new CronTrigger("cronTrigger", "NJob", "0/2 * * * * ?");

sche.scheduleJob(jDetail, crTrigger);
}
}

MyJob.java

package com.cron;

import org.quartz.Job;
import org.quartz.JobExecutionContext;
import org.quartz.JobExecutionException;

public class MyJob implements Job {

public void execute(JobExecutionContext context)
throws JobExecutionException {

System.out.println("Cron executing ");

}
}

Another option to use quartz api

2. Quartz with ServletContextListener

web.xml

<web-app>

<display-name>timer</display-name>

<listener>
<listener-class>com.cron.StartCron</listener-class>
</listener>

</web-app>

StartCron.java

package com.cron;

import javax.servlet.ServletContextEvent;
import javax.servlet.ServletContextListener;

public class StartCron implements ServletContextListener{

public void contextDestroyed(ServletContextEvent arg0)
{
System.out.println("Stopping Application successfully");
}

public void contextInitialized(ServletContextEvent arg0)
{
System.out.println("Initializing Application successfully");

try{
CronScheluder objPlugin = new CronScheluder();
}
catch(Exception e)
{
e.printStackTrace();
}
}
}

All rest of code is same and use

CronScheluder.java

MyJob.java

3. Quartz with Struts

You have to define in struts-config.xml file a plugin

 <plug-in className="com.cron.StrutsImp">
<set-property property="startOnLoad" value="true"/>
<set-property property="startupDelay" value="0"/>
</plug-in>

StrutsImp.java

package com.cron;

import javax.servlet.ServletContext;
import javax.servlet.ServletException;
import org.apache.struts.action.ActionServlet;
import org.apache.struts.action.PlugIn;
import org.apache.struts.config.ModuleConfig;

public class StrutsImp implements PlugIn {

public static final String PLUGIN_NAME_KEY = StrutsImp.class.getName();

public void init(ActionServlet servlet, ModuleConfig config)
throws ServletException {

try {
System.out.println("Initializing PlugIn");

ServletContext context = null;

context = servlet.getServletContext();

CronScheluder objPlugin = new CronScheluder(context);

context.setAttribute(PLUGIN_NAME_KEY, objPlugin);

System.out.println("scheluder started successfully...");

}
catch (Exception ex) {
ex.printStackTrace();
}

}

public void destroy()
{

}

}

2010년 4월 3일 토요일

VisualSVN

1. 파일 다운로드


a. 서버용 프로그램 : VisualSVN-Server

b. 클라이언트 프로그램 : TortoiseSVN / 한 글 언어팩

c. CommitMonitor (Commit 알림기능)


2. 서버 설치


a. Select Components : VisualSVN Server and Management Console

b.  Custom Setup

- Location : 프로그램 설치 폴더

- Repositories : 저장소 폴더

- Sever Port : https포트 (Use secure connection 체크)

- Authentication : "서브버전 계정" 또는 "윈도우 계정" 선택


3. HTTPS 동작확인


a. 익스플로러 실행하여 주소칸에 https://localhost/ 입력

b. "이 웹 사이트를 계속 탐색합니다.(권장하지 않음)" 선택

c. 로그인


4. 사용자 등록


a. VisualSVN-Server Manager 실행

b. 프로그램 우측의 User 폴더 우클릭하여 "Create User" 실행

c. 사용자ID 및 비밀번호 입력 후 "OK"


5. 저장소 생성


a. 프로그램 우측의 Repositories 폴더 우클릭하여 "Create New Repository" 실행

b. 저장소 이름입력

(Create default structure 체크시 "trunk", "branches", "tags" 3개의 폴더가 기본 생성됨)


6. 백업

a. 백업

# svnadmin dump 저장소절대경로 > 덤프파일
예) svnadmin dump C:\svn_root\project > project.dump
b. 저장소 생성

# svnadmin create 새로만들저장소절대경로
예) svnadmin create  C:\svn_root\project2

c. 복구

# svnadmin load 새로만들저장소절대경로 < 덤프파일명
예) svnadmin load C:\svn_root\project2 < project.dump

[출처] VisualSVN|작성자 푸우님


2010년 4월 2일 금요일

flash post 방식

http://kin.naver.com/qna/detail.nhn?d1id=1&dirId=10402&docId=68350639&qb=Zmxhc2ggcG9zdA==&enc=utf8&section=kin&rank=4&sort=0&spq=1&pid=fJU8ng331y0sscBrbxKssv--300024&sid=S7X8PQOztUsAAHjrD8A


============= 플래시 부분 ==============

 rewriteObj = new LoadVars();
 rewriteObj.num = this.num;
 rewriteObj.sendAndLoad(" 호출할파일주소(*.asp)", rewriteObj, "post");
 rewriteObj.onLoad = function() {
  if (this.result == "ok") {
   trace("1을 받았습니다.")
  } else {

trace("1을받지 않았습니다.")
    }


==================== asp 부분 =================

num = request("num")

if num = "1" then

response.write "&result=ok"

else

response.write "&result=fail"

end if


2010년 3월 10일 수요일

Catmull-Rom Spline

보간 - Catmull-Rom Spline
http://www.gisdeveloper.co.kr/archive/200902#entry_468

double catmullRomSpline(float x, float v0,float v1, float v2,float v3) {  
    double c1,c2,c3,c4;  
 
    c1 = M12*v1;  
    c2 = M21*v0 + M23*v2;  
    c3 = M31*v0 + M32*v1 + M33*v2 + M34*v3;  
    c4 = M41*v0 + M42*v1 + M43*v2 + M44*v3;  
 
    return(((c4*x + c3)*x +c2)*x + c1);  

2010년 3월 3일 수요일

리눅스 파일 검색

출처 : http://lbjcom.net/tag/%ED%8C%8C%EC%9D%BC%20%EA%B2%80%EC%83%89

문자열찾기 방법 1 - 영어만 주로 가능
grep -rw "찾는문자열" ./

문자열찾기 방법 2 - 대/소문자 구분 안하고 검색
grep -i -l "찾는문자열" * -r 2> /dev/null

문자열찾기 방법 3 - 한글, 영어 모두 가능
find . -exec grep -l "찾는문자열" {} \; 2>/dev/null

문자열찾기 방법 4 - 한글,영어, 대소문자 안가리고 검색
find . -exec grep -i -l "찾을문자열" {} \; 2>/dev/null

문자열찾은 후 치환
find . -exec perl -pi -e 's/찾을문자열/바꿀문자열/g' {} \; 2>/dev/null

파일명 찾기
find / -name 파일명 -type f

파일명 찾기(대소문자 구별없음)
find / -iname 파일명 -type f

디렉토리 찾기
find / -name 파일명 -type d

디렉토리 찾기(대소문자 구별없음)
find / -iname 파일명 -type d 

[출처] 리눅스 파일 검색|작성자 두한

2010년 2월 9일 화요일

find bugs


버그의 가능성이 있는 코드를 검출


LGPL 기반 오픈소스


http://findbugs.sourceforge.net/


이클립스 플러그인 업데이트

http://findbugs.cs.umd.edu/eclipse/

2010년 1월 28일 목요일

window.open

출처 : http://msdn.microsoft.com/library/default.asp?url=/workshop/author/dhtml/reference/methods/open_0.asp


Opens a new window and loads the document specified by a given URL.

Syntax

oNewWindow = window.open( [sURL] [, sName] [, sFeatures] [, bReplace])

Parameters

sURL Optional. String that specifies the URL of the document to display. If no URL is specified, a new window with about:blank is displayed.
sName Optional. String that specifies the name of the window. This name is used as the value for the TARGET attribute on a form or an a element.
_blank The sURL is loaded into a new, unnamed window.
_media The sURL is loaded into the HTML content area of the Media Bar. Available in Microsoft Internet Explorer 6 or later.
_parent The sURL is loaded into the current frame's parent. If the frame has no parent, this value acts as the value _self.
_search Available in Internet Explorer 5 and later. The sURL is opened in the browser's search pane.
_self The current document is replaced with the specified sURL .
_top sURL replaces any framesets that may be loaded. If there are no framesets defined, this value acts as the value _self.
sFeatures Optional. This String parameter is a list of items separated by commas. Each item consists of an option and a value, separated by an equals sign (for example, "fullscreen=yes, toolbar=yes"). The following features are supported.
channelmode = { yes | no | 1 | 0 } Specifies whether to display the window in theater mode and show the channel band. The default is no.
directories = { yes | no | 1 | 0 } Specifies whether to add directory buttons. The default is yes.
fullscreen = { yes | no | 1 | 0 } Specifies whether to display the browser in full-screen mode. The default is no. Use full-screen mode carefully. Because this mode hides the browser's title bar and menus, you should always provide a button or other visual clue to help the user close the window. ALT+F4 closes the new window. A window in full-screen mode must also be in theater mode (channelmode).
height = number Specifies the height of the window, in pixels. The minimum value is 100.
left = number Specifies the left position, in pixels. This value is relative to the upper-left corner of the screen. The value must be greater than or equal to 0.
location = { yes | no | 1 | 0 } Specifies whether to display the input field for entering URLs directly into the browser. The default is yes.
menubar = { yes | no | 1 | 0 } Specifies whether to display the menu bar. The default is yes.
resizable = { yes | no | 1 | 0 } Specifies whether to display resize handles at the corners of the window. The default is yes.
scrollbars = { yes | no | 1 | 0 } Specifies whether to display horizontal and vertical scroll bars. The default is yes.
status = { yes | no | 1 | 0 } Specifies whether to add a status bar at the bottom of the window. The default is yes.
titlebar = { yes | no | 1 | 0 } Specifies whether to display a title bar for the window. This parameter is ignored unless the calling application is an HTML Application or a trusted dialog box. The default is yes.
toolbar = { yes | no | 1 | 0 } Specifies whether to display the browser toolbar, making buttons such as Back, Forward, and Stop available. The default is yes.
top = number Specifies the top position, in pixels. This value is relative to the upper-left corner of the screen. The value must be greater than or equal to 0.
width = number Sets the width of the window, in pixels. The minimum value is 100.
bReplace Optional. When the sURL is loaded into the same window, this Boolean parameter specifies whether the sURL creates a new entry or replaces the current entry in the window's history list.
true sURL replaces the current document in the history list
false sURL creates a new entry in the history list.

Return Value

Returns a reference to the new window object. Use this reference to access properties and methods on the new window.

Remarks

By default, the open method creates a window that has a default width and height and the standard menu, toolbar, and other features of Internet Explorer. You can alter this set of features by using the sFeatures parameter. This parameter is a string consisting of one or more feature settings.

When the sFeatures parameter is specified, the features that are not defined in the parameter are disabled. Therefore, when using the sFeatures parameter, it is necessary to enable all the features that are to be included in the new window. If the sFeatures parameter is not specified, the window features maintain their default values. In addition to enabling a feature by setting it to a specific value, simply listing the feature name also enables that feature for the new window.

Internet Explorer 5 allows further control over windows through the implementation of title in the sFeatures parameter of the open method. Turn off the title bar by opening the window from a trusted application, such as Microsoft Visual Basic or an HTML Application (HTA). These applications are considered trusted, because each uses Internet Explorer interfaces instead of the browser.

When a function fired by an event on any object calls the open method, the window.open method is implied.

<SCRIPT LANGUAGE="JScript">
function foo() {
    open('about:blank');}
</SCRIPT>
<BODY onclick="foo();">
Click this page and window.open() is called.
</BODY>

When an event on any object calls the open method, the document.open method is implied.

<BUTTON onclick="open('Sample.htm');">
Click this button and document.open() is called.
</BUTTON>

Internet Explorer 6 for Microsoft Windows XP Service Pack 2 (SP2) places several restrictions on windows created with this method. For several of the parameter values listed in the Parameters table, these restrictions are indicated by the minimum value. For more information, see About Window Restrictions.

This method must use a user-initiated action, such as clicking on a link or tabbing to a link and pressing enter, to open a pop-up window. The Pop-up Blocker feature in Internet Explorer 6 blocks windows that are opened without being initiated by the user. The Pop-up Blocker also prevents windows from appearing if you call this method from an onunload event.

Example

This example uses the open method to create a new window that contains Sample.htm. The new window is 200 pixels by 400 pixels and has a status bar, but it does not have a toolbar, menu bar, or address field.

window.open("Sample.htm",null,
    "height=200,width=400,status=yes,toolbar=no,menubar=no,location=no");

톰캣 재시작

tomcat/bin/catalina.sh stop

tomcat/bin/catalina.sh start

2010년 1월 27일 수요일

null , undefined , typeof , === , ==

요즘 JavaScript The Definitive Guide를 보고 있다
영어도 못하는 녀석이 이 책보느라고 고생이다

여태까지는 깊이 와닫는 부분이 없었는데.. 오늘 정말 모르던것을 알아버렸다!!!

alert(typeof(document.getElementById("obj_id"))); 1. if (document.getElementById("obj_id") == null){ alert("null"); } 2. if (document.getElementById("obj_id") == undefined){ alert("undefined"); } 3. if (document.getElementById("obj_id") === null){ alert("null"); } 4. if (document.getElementById("obj_id") === undefined){ alert("undefined"); }


만일 obj_id라는 ID를 갖는 HTML Element가 없는경우에
document.getElementById("obj_id")의 결과는  null 이다

그런데 alert(typeof(null)) 하면 object 가 찍힌다.. 자바스크립트는 null도 object로 인식한다
뭐 여기까지는 많은 사람들이 알고 있을것이다. 물론 나도 알고 있었고..

그런데 내가 일반적으로 특정 object가 있는지 없는지 확인하던 그 1번 if문이 틀린거였다
실제로 1번 2번 스크립트를 실행하면 둘다 alert가 뜬다. null , undefined 둘다...

null 이랑 undefined를 비교할때는 === 나 !== 를 써야 한단다..
동치 비교라고 하는데 값 뿐만아니라 형식까지 비교하는 연산자다

책에는
When null is used in a Boolean contentx , it convers to false. When used in a numeric context , it convert to 0 . and when used in a string context, it converts to "null".

When undefined value is used in a Boolean context, it convers to false. When used in a numeric context, it converts to NaN. and when used in a string context, it converts to "undefined"

이렇게 되어있는걸로 봐서는 둘다 false 값으로 변해서 값이 동일하기 때문에 값만 비교해서는 정확한 비교가 안이루어지는것 같다...

이제 특정 object가 있는지 없는지 판단할때는 반드시 === 를 사용하는 습관을 들여야 겠다

펌글)

http://nova23.tistory.com/5

2010년 1월 21일 목요일

레이아웃 최소1000px ( 헤더, 메뉴, 컨텐트[최대넓이] )

/* 전체 레이아웃 */
<body>
 <!-- 전체를 싸고 있는 부분(최소넓이는 1000px)-->
 <div id="PAGE_WRAP">
  <!-- 헤더 부분 -->
  <div id="HEADER">
  </div>
  <div id="CONTENT">
   <!-- 컨텐트 왼쪽 부분 -->
   <div id="LEFT_CONTENT">
   </div>
   <!-- 컨텐트 오른쪽 부분 -->
   <div id="RIGHT_CONTENT">
    <div id="RIGHT_CONTENT_WIDTHFIX">
    </div>
   </div>
  </div>
 </div>
</body>


- css

#PAGE_WRAP {
 min-width:1000px;
    width:expression(document.body.clientWidth < 1001 ? '1000px' : '100%');
}
#HEADER {float:left;  margin-bottom:10px; height:100px; width:100%; border:#777 2px solid; background:#444; }
#CONTENT {clear:both;}
#LEFT_CONTENT {float:left; width:200px;}
#RIGHT_CONTENT {float:right; margin-right:-210px; width:100%; }
#RIGHT_CONTENT_WIDTHFIX {margin-right:220px;}

2010년 1월 18일 월요일

확장자만 가져오기

String fileName="test.exe"
          String ext="";
          int i=fileName.lastIndexOf('.');
          if(i>0 && i <fileName.length()-1)
          {
           ext=fileName.substring(i+1).toLowerCase();
          }

JSP 내장 객체

JSP 내장 객체

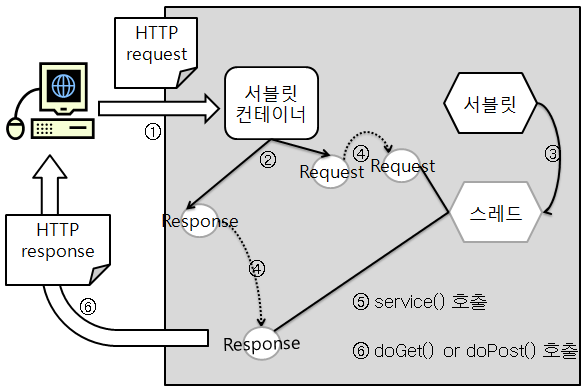
서블릿 컨테이너의 웹 브라우저 요청 처리 방법

1. 사용자가 선택한 링크에 의해 웹 브라우저로부터 들어온 요청(HTTP request)을 컨테이너가 받아들입니다.

2. 컨테이너는 요청한 서블릿을 위해 HttpServletRequest와 HttpServletResponse 객체를 생성합니다. HttpServletRequest 객체는 폼 파라메터 정보를 가지고 있습니다.

3. 서블릿은 스레드를 만들어서 서비스할 준비를 합니다.

4. 서블릿 컨테이너는 request 객체와 response 객체를 인자로 스레드에게 전달합니다.

5. 컨테이너는 service() 메서드를 호출하여 6. GET 방식으로 처리할 지 POST 방식으로 처리할 결정합니다. doGet() 메서드나 doPost() 메서드를 호출하여 동적인 HTML 문서를 response 객체에 담아서 전송합니다.

request 객체
(javax.servlet.http.HttpServletRequest)

웹 브라우저로부터 전송받은 HTTP request message의 HTTP Header 부분과 HTTP Body 부분의 정보를 보관하고 있는 객체입니다.

request parameter 처리 메서드들

public String getParameter(String name)
요청 파라메터 name에 할당된 값을 리턴합니다.
public Enumeration getParameterNames()
요청에 사용된 모든 파라메터 이름을 리턴합니다.
public String[] getParameterValues(String name)
지정된 파라메터 이름에 대한 값들을 리턴합니다. CGI Form 에서 같은 name 속성으로 지정된 값들은 이 메서드를 사용하여 읽어낼 수 있습니다.
<%@ page language="java" contentType="text/html; charset=UTF-8"
    pageEncoding="UTF-8"%>
<%@ page import="java.util.Enumeration" %>
<!DOCTYPE html PUBLIC "-//W3C//DTD HTML 4.01 Transitional//EN"
    "http://www.w3.org/TR/html4/loose.dtd">
<html>
<head>
<meta http-equiv="Content-Type" content="text/html; charset=UTF-8">
<title>파라메터 정보 읽기</title>
</head>
<body>
<h1>파라메터 정보 읽기</h1>
<p>
<%= request.getQueryString()%><br />
<%
Enumeration<String> paraNames = request.getParameterNames();

while (paraNames.hasMoreElements()) {
	String paraName = paraNames.nextElement();
%>
	<strong><%= paraName %></strong>:
	<%= request.getParameter(paraName) %><br />
<%
}
%>
</p>
</body>
</html>
<%@ page language="java" contentType="text/html; charset=UTF-8"
    pageEncoding="UTF-8"%>
<% request.setCharacterEncoding("UTF-8"); %>
<!DOCTYPE html PUBLIC "-//W3C//DTD HTML 4.01 Transitional//EN"
    "http://www.w3.org/TR/html4/loose.dtd">
<html>
<head>
<meta http-equiv="Content-Type" content="text/html; charset=UTF-8">
<title>Checkbox 데이터</title>
</head>
<body>
<h1>취미 선택</h1>
<form method="post" action="<%= request.getRequestURL() %>">
<input type="checkbox" id="chk1" name="hobby" value="축구" />
<label for="chk1">축구</label>
<input type="checkbox" id="chk2" name="hobby" value="배구" />
<label for="chk2">배구</label>
<input type="checkbox" id="chk3" name="hobby" value="농구" />
<label for="chk3">농구</label><br />
<input type="checkbox" id="chk4" name="hobby" value="바둑" />
<label for="chk4">바둑</label>
<input type="checkbox" id="chk5" name="hobby" value="낚시" />
<label for="chk5">낚시</label>
<input type="checkbox" id="chk6" name="hobby" value="등산" />
<label for="chk6">등산</label><br />
<input type="submit" value="전송" />
</form>
<% if (request.getParameter("hobby") != null) { %>
<p>
당신이 선택한 취미 :
	<% boolean toggle = false; %>
	<% for (String value : request.getParameterValues("hobby")) { %>
		<% if (toggle) out.println(", "); else toggle = true; %>
		<%= value %>
	<% } %>
</p>
<% } %>
</body>
</html>

HTTP 헤더와 관련한 메서드들

public String getHeader(String headerName)
HTTP 요청 헤더에 지정된 headerName의 값을 리턴합니다.
public Enumeration getHeaderNames()
HTTP 요청 헤더에 지정된 모든 헤더의 이름을 리턴합니다.
public Enumeration getHeaders(String headerName)
HTTP 요청 헤더에 포함된 모든 값들을 리턴합니다.
public int getIntHeaders(String headerName)
HTTP 요청 헤더에 지정된 headerName의 값을 int 형으로 리턴합니다.
public long getDateHeader(String headerName)
HTTP 요청 헤더에 포함된 headerName의 값을 1970년 1월 1일 0시 0분을 기준으로 한 현재까지의 밀리초를 리턴합니다.
<%@ page language="java" contentType="text/html; charset=UTF-8"
    pageEncoding="UTF-8"%>

<%@ page import="java.util.Enumeration" %>
<!DOCTYPE html PUBLIC "-//W3C//DTD HTML 4.01 Transitional//EN"
"http://www.w3.org/TR/html4/loose.dtd"> <html> <head> <meta http-equiv="Content-Type" content="text/html; charset=UTF-8"> <title>Request 정보 확인 예</title> </head> <body> <h1>Header 정보들</h1> <p> <%= request.getMethod() %> <%= request.getRequestURL() %> <%= request.getProtocol() %><br /> <% Enumeration<String> headerNames = request.getHeaderNames(); while (headerNames.hasMoreElements()) { String headerName = headerNames.nextElement(); %> <%= headerName %>: <%= request.getHeader(headerName) %><br /> <% } %> </p> </body> </html>
<%@ page import="java.util.Enumeration" %>
<%
request.setCharacterEncoding("UTF-8");
%>
<!DOCTYPE html PUBLIC "-//W3C//DTD HTML 4.01 Transitional//EN"
	"http://www.w3.org/TR/html4/loose.dtd">
<html>
<head>
<meta http-equiv="Content-Type" content="text/html; charset=UTF-8">
<title>POST 방식</title>
</head>
<body>
<form method="post" action="jsp_request_ex03.jsp">
<label for="user">사용자</label>
<input type="text" id="user" name="user" /><br />
<label for="passwd">암호</label>
<input type="password" id="passwd" name="passwd" /><br />
<input type="submit" value="전송" /><input type="reset" value="취소" />
</form>
<% if (request.getParameterNames() != null) { %>
<p>
	<%
	Enumeration<String> parameters = request.getParameterNames();
	while (parameters.hasMoreElements()) {
		String parameter = parameters.nextElement(); %>
		<%= parameter %>: <%= request.getParameter(parameter) %><br />
	<% } %>
</p>
<% } %>
</body>
</html>

세션과 관련한 메서드들

public HttpSession getSession()
요청을 시도한 클라이언트에 지정된 HttpSession 객체를 리턴합니다. 만일 이전에 생성된 HttpSession 객체가 존재하지 않으면 새로운 세션 객체를 생성합니다.
public HttpSession getSession(boolean create)
create의 값이 true인 경우 이전에 생성된 HttpSession 객체가 존재하지 않으면 새로운 세션 객체를 생성합니다. false인 경우 null을 리턴합니다.
public String getRequestedSessionId()
요청을 시도한 클라이언트의 세션 id를 리턴합니다.
public boolean getRequestedSessionIdValid()
요청에 포함된 세션 id가 유효 여부를 리턴합니다.
isRequestedSessionIdFromCookie()
요청에 포함된 클라이언트의 세션 id가 쿠키로 전달되었는지 여부를 리턴합니다.
isRequestedSessionIdFromURL()
요청에 포함된 클라이언트의 세션 id가 URL에 포함되었는지 결과를 리턴합니다.

쿠키와 관련된 메서드

public Cookie[] getCookies()
클라이언트의 요청에 포함된 쿠키를 리턴합니다.

요청에 포함된 URL/URI와 관련한 메서드들

public String getRequestURI()
요청에 포함된 URL에서 URI 문자열을 리턴합니다.
public String getQueryString()
요엋에 포함된 쿼리 문자열을 리턴합니다.
public String getMethod()
요청에 포함된 요청 방식을 리턴합니다.

인코딩과 관련한 메서드

public void setCharacterEncoding(String encoding)

CGI Form을 통해 전달된 파라메터 값들을 일괄적으로 인코딩을 지정하는 메서드입니다. 톰캣에서는 4 버전부터 사용되고 있으며 다음 코드의 대신 사용합니다.

String name = request.getParameter("name");
if (name != null)
	name = new String(name.getBytes("8859_1"), "euc-kr");

웹 브라우저로부터 전송된 파라메터는 기본적으로 "ISO 8859-1"로 인코딩되기 때문에 한글 사용시 서버측으로 전송된 파라메터의 인코딩을 "EUC-KR"이나 "UTF-8"로 인코딩을 다시 변환해 주어야 한글이 제대로 서버로 전송됩니다.

response 객체
(javax.servlet.http.HttpServletRespose)

요청을 시도한 클라이언트로 전송할 응답 메시지를 저장하고 있는 객체입니다.

public void addCookie(javax.servlet.http.Cookie cookie)
쿠키를 응답 헤더에 추가합니다. 클라이언트는 이 응답을 받으면 지정된 쿠키를 저장하게 됩니다.
public boolean containsHeader(String headerName)
응답 헤더에 지정된 headerName의 포함 여부를 리턴합니다.
public void sendRedirect(String location) throws IOException
지정된 location으로 요청을 재전송합니다. 웹 브라우저의 주소창의 주소가 변경됩니다.
pulbic String encodeURL(String url)
현재 요청을 사용한 클라이언트가 쿠키를 지원할 경우 파라메터로 받은 URL을 그대로 문자열로 리턴하고 쿠키를 지원하지 않을 경우 URL에 세션 id를 쿼리 문자열로 추가한 URL을 리턴합니다. 세션이 유지된 클라이언트의 세션 id를 전송하려는 경우 URL Rewriting 기법을 사용할 수 있도록 지원합니다.
public String encodeRedirectedURL(String url)
세션이 유지된 클라이언트의 세션 id를 쿠키를 지원하지 않는 브라우저로 전달하기 위해 URL에 세션 id를 쿼리 문자열로 추가하여 리턴합니다.
public void setStatus(int status_code)
HTTP 응답 상태 코드를 설정합니다. 웹 서버가 자동으로 설정하는 응답 코드를 프로그래머가 의도적으로 변경할 수 있도록 합니다.
public void sendError(int status_code) throws IOException
setStatus()와 비슷하지만 서버측 에러 상황을 클라이언트로 전송하기 위해 HTTP 응답 헤더에 상태 코드를 설정합니다.
public void sendError(int status_code, String message) throws IOException
서버측 에러의 상태 코드와 설명 메시지를 함께 설정합니다.
public void setHeader(String headerName, String value)
HTTP 응답 헤더에 프로그래머가 지정한 헤더 정보를 설정합니다.
public void setDateHeader(String headerName, long dateMil)
1970년 1월 1일 0시 0분 0초를 기준으로 밀리초 경과된 날짜를 헤더 정보로 설정합니다.
public void setIntHeader(String headerName, int intValue)
int 값을 헤더 정보로 설정합니다. "Expires"와 같이 숫자 값을 가지는 헤더 정보 설정에 사용합니다.


펌글!!!!

http://jeongsam.net/126

2010년 1월 15일 금요일

숫자만를 전화번호형식(000-0000-0000)으로 표현

 /**
  * 숫자만 으로 이루어져 있는 전화번호를 형식을
  * 000-0000-0000 으로 표현하기 위해 만듬
  *  예) 027651111 => 02 - 765 - 1111
  */
 private String change(String text)
 {
  int textLength = text.length();
  String textOut ="";

  if(textLength>=9)
  {
   int startIndex=0;
   if("02".equals(text.substring(0,2)))
   {
    textOut+="02";
    startIndex+=2;
   }
   else
   {
    textOut+=text.substring(0,3);
    startIndex+=3;
   }
   textOut+=" - "+text.substring(startIndex,textLength-4);
   textOut+=" - "+text.substring(textLength-4,textLength);    
  }   
  return textOut;
 }
 

2010년 1월 13일 수요일

javascript 를 이용하여 창 크기 구하기!!

브라우져의 본문의 크기는 다음과 같이 구할 수 있습니다.

window.document.body.offsetWidth
window.document.body.offsetHeight
window.document.body.clientWidth
window.document.body.clientHeight
 

clientWidth,clientHeight는 offsetWidth,offsetHeight와 달리 padding사이즈를 포함하지만 margin,border,scroll bar의 크기는 포함하지 않은 사이즈입니다.


※참고

window.screen.width
window.screen.height
window.screen.availWidth
window.screen.availHeight
 

screen객체로 해상도를 구할 수 있습니다.

availWidth,availHeight는 윈도우 task bar의 크기를 제외하고 구해집니다